New Inspiration!

At Christmas, while my family was  spoiled with  toys, video games and other gifts under the  tree, I was spoiled with gift cards from my wonderful husband. The second I opened them I  knew what I was going to use them for.

Ever since a friend of mine showed me how to use  my sewing machine I have been making trips to the library quite often.  I  have  taken out every sewing book that I can get my hands on.  For the most  part I don’t  get to read  very much of them  before I have to head back  but I still enjoy the tiny bits I get through.

There are a few that I have taken out more than a couple of times so I figured it was time to add them to my library.  The  first is Weekend Sewing by Heather Ross.

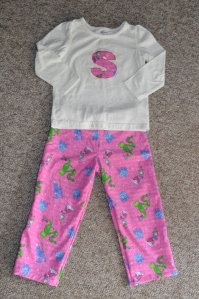
There are so many great projects in this book that I have been wanting to try.  Tunics, bags, a play tent and little girl dresses too.  I used the  pajama bottom pattern from the book to make these:

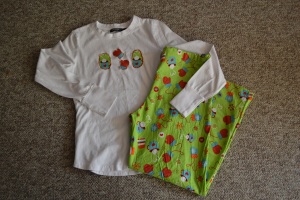
And these:

And four  other pairs of PJ bottoms  that my family wore on Christmas morning.

Growing Up  Sew Liberated by Meg McElwee is another favorite of mine that I knew I  had to have.  

My plan for  Christmas 2012 is  to have a  75% Handmade Christmas (yes I know it’s only January but if I start planning now  perhaps it will happen).  This  book has a variety of  patterns;  a teepee,  toy bins, dolls, papooses, capes, art satchels and more. I  think I will be able to  finish almost all our  gifts for my four girls from this  book alone as well as some of the other little ones in my life.  If you are looking for some great  gift ideas for some  special little people in your life this would be a perfect  place to start.

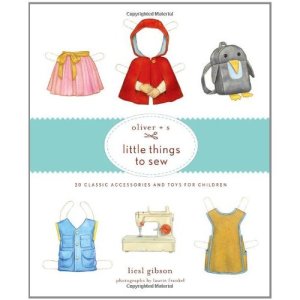
Oliver +S, Little Things to Sew  is a book  that I was drawn to immediately because of the adorable paper doll clothing images on the cover. I mean seriously,  how cute are they?  So yes, I  judged this book by its cover and was not disappointed. Super cute  projects like art smocks, backpacks, hats, messenger bags and a fantastic pattern for a  Bento Box carrier that I will definitely be making.  There is also a  quilt in there  that I will be trying to  make despite the fact that my previous attempts have been less than successful. Practice makes perfect right?

Now  there is still one book that I haven’t added to  my  collection but I will one of these days.  Wee Wonderfuls by Hilary Lang.  This  book is packed with beautiful dolls.  B-E-A-U-T-I-F-U-L dolls.  Couple of my favorites are the Ellie backpack, the Tag along doll (which has an accompanying pattern for an apron that she  can be carried around in) which my girls have been begging me to make for them and  a few little critters  that would be a welcome addition to any child’s room.  If  you have some time you should check out her site http://www.weewonderfuls.com/ it is totally worth a visit and  I am  sure you will love her work as much as I do.

I  figured that  buying these books would  be a good financial move especially considering the amount of fines I racked up from the library.

So  now that  I am  dripping with inspiration, I  just  need  to find a bit of time to  get it all done.  Easy Peasy Lemon Squeezy Right?

What  projects do you have  planned for yourself this year? Where does your inspiration come from?

Oh Deer.

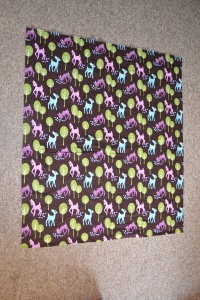
I wonder if there is anyone out there who loves Michael Miller Fabric as much as I do.  My newest favourite of his  is the Pet Deer fabric.  It is so sweet.  The  little deer and tree pattern  is a perfect fit for  my youngest daughter’s room so when I came across it a at the fabric shop I  had to have it (my husband disagrees with this statement but I bought it anyway).

We have  gotten into the habit of  keeping our babies in bed with us mainly because I means I get more sleep but we are now approaching the time where our youngest daughter needs to transition to her bed.  I have  kind of been dragging my heels this time around  because she is our last baby and I love the closeness  of having her sleep with us.  However… being the  grown ups that we are, my husband we have decided that  Camryn needs to  go into her own bed.  Can you imagine anyone not wanting to snuggle this little one all night?

Anyway, the  last  barrier to starting this transition  has been  me sewing her  bedding set. You can imagine that in a  house with 4 little girls there isn’t a ton of time to sew but over the last few days I have managed to  work on it and finally finished it.  I think it’s pretty sweet.  I  made a  simple crib ruffle and  baby sized duvet cover for a  down duvet that my mom had picked up over the summer.

The cover was actually quite easy to make.

I measured the duvet and added an inch to each side for  seam allowance and  to  give me a bit  of  extra room to topstich a  small edge around the outside  of the  cover.  Then I  cut my  deer fabric.

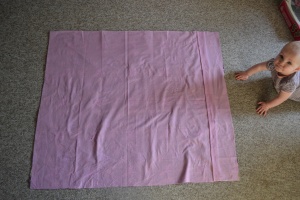
For the back I chose a  co-ordinating  purple cotton.   I didn’t  want to  use snaps  on the  backside and did an  overlapping flap instead so the cutting was a  little different.  Instead 1 piece there were two.   In the  picture you can see there is a 3 inch overlap.   I think next time I would probably make it a 5  inch over lap.  (I love the little baby fingers.  I couldn’t bring myself to  crop them out of the picture.)

I did a hem (is it  still called a  hem if it’s not on pants?) on both pieces of the back fabric before  placing it onto the front fabric. I made sure the  deer were right side up and that the  short flap was at the bottom of the cover.

I pinned around the edges and sewed around the outside, turned it rightside out and  did a  quick topstitch around the outside edge to give it a  finished look.  I  think it turned out pretty  good.

I  think she likes it too! If  you look in the picture  you can see  the white duvet a bit,  I think a  bigger overlap would help this a bit. I looks great  with the matching ruffle I made for it and the tree on the wall of her room too.

Sigh… well unless you can think of any reason why she can’t sleep in there I guess we start the transition. Can you think of any reason??

How Not to Quilt: An Untutorial

Before I  begin the untutorial I would like to  mention a few things.

1. I  hate minky.

2. I have made one  quilt with a great deal of help.

3. I am a LAZY Sewist.

Ok here we go.

The Untutorial

Step 1: Choose a difficult fabric (preferably one that requires a higher level of  skill to work with than you currently have)

I chose minky to make this  quilt.  Minky is finicky. It is stretchy and fuzzy.  It  covers your clothes with fuzz and fluff. It gums up your sewing machine with fuzz and fluff, it covers every floor, desk and work surface with fuzz and fluff.

Step 2: Don’t  pin anything together before you start sewing. Seriously.

Rather than wasting time pinning fabric together  just sew.  This  will produce uneven seams and patterns but think of all the time you will save!

Step 3: Rather than fix your mistakes as you go leave them all to the end and then try to fix them by stretching the material.

This  will leave you with  uneven lines and edges  but again, think of all the  time you will save.

Step 4: Rather than attempting  to properly bind the quilt, use a rolled hem and cross your fingers.

Because the  fabric was so hard to work with I had no idea how to  do a traditional binding for it so I decided to wing it.  The  results were not good!  The edge I  sewed  is  so uneven because I was using 2  hands to hold the  hem in place  so I wouldn’t have to pin it.  Seriously.

Step 5: Go to the  store and buy a  gift to replace the quilt you were initially  going to  give your family member for a baby shower gift.

Do  you  ever  do something  and think to yourself afterwards “What was I thinking?”  That was totally  what this  was for me.  There were a few positive things though.  First of all I  got some experience working with minky.  Secondly i  learned the value of  pinning. Thirdly my  girls now have a  cozy blanky for their picnics.

So there you have it.  My first (and hopefully last) untutorial.  Please tell me  that  some of you have created disasters too?

Bloggers Choice!

I know it’s been a while  since my last post  but I came across this “blogger’s Choice giveaway” and I  just couldn’t help myself.   I  am a fabric junky.  I never thought  those words  would come out of  my  mouth  but the more  sewing I do, the  more I find  myself  drooling over fabric.  In fact I  have a ton of  fabric in my  possession.

When I saw this  giveaway I  thought it would  be a  great opportunity to  get back to  my  blog and possibly add to my  fabric stash.

If  you are a sewist and  have a  bit of time, head over  to Quokka Quilts and check out  how to enter.  At the very least it will give you a chance to  drool over the huge selection of  fabric at the Fat quarter shop.

Here’s my submission:

FQS Giveaway

Here’s a  list of the fabrics I  chose:

Hoo’s in the Forest Cute little Blue Trees

Hoo’s in the Forest Green Sweet Trees

Hoo’s in the forest Pink  sweet trees

Hoo’s in the forest Pink Plaid

Meadow Friends Cotton Posie Pink and lotsa dots

Meadow Friends Cotton Pond Blue and lotsa dots

Hall of fame Yellow Game

Stella Pink Solid

Stella Yellow Solid

Stella  Turquoise Solid

Bella Solids Light Pink

Enjoy  your  search.  I  hope you have as much  fun as I did!


A Baby Gift

With the arrival of summer (finally!) many of my friends are also expecting the arrival of their new babies. And the arrival of new babies means Baby showers!

I love these celebrations of new lives and new families.  Every time I attend one I am always reminded of how wonderful the baby days are. *Sigh*

Thinking back to all of the gifts I received at my baby showers, I have a special place in my heart for the ones that were homemade. I loved the idea that someone took the time to make something special and unique for my baby. Now that I can do a  bit of sewing  I am quite excited that I can make something special for friends and family when their little ones come along.

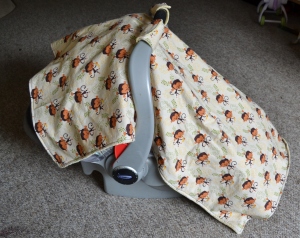
A co-worker of  mine is due any day  with her baby boy.  Being the proud mom of  4 girls I  love getting  the opportunity to make boy things (even if it means just using a non pink fabric).  I decided I wanted to make  something useful for the new Mom and her new little man and after much thought I  decided on this:

Car Seat Cover

I saw something similar to this  when I was at the park  a few weeks ago.   They looked  fairly easy to make so I  thought I would give it a try.  They are super useful too.  They block the sun in the summer,  keep the cold  and wind out in the winter,  and if you  don’t like people touching your  new baby when you are out and about, they are wonderful shields too!

You will need:

2 pieces of  fabric 29″ x 39″ ( one printed cotton and one for the back,  I used minkee for this one)

4 pieces of 4″ x 8″ fabric ( 2 from the printed cotton and 2 from whatever you are using for the back)

2 pieces of 3″ x 1″ velcro

Matching thread

Here’s how you make it:

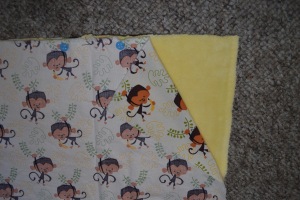
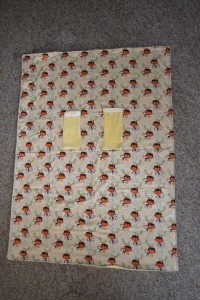
1. Take your two 29″ x 39″ pieces of fabric and place them with the right sides facing

and pin the outside edges  together.  (Don’t you just love the monkeys?)

2. beginning around the halfway point on one of the sides begin  sewing the edges together leaving an opening  of about 6 inches to  turn the blanket right side out.

3. Using a knitting needle, or  whatever long stick like item you may have on hand (I used a  wooden chopstick) push the  edge seams  and corners out.  Topstitch around the outside of the whole rectangle including the unsewn opening (be sure to fold the edges in  before you topstitch it.

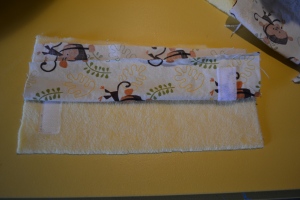
4.  Take one of the printed cotton 4″ x8″ rectangles and  sew the hook side of one of the velcro strips  about 1 1/3″ from the top of the right side.  Sew the  fuzzy piece of the velcro to the top of the right side of the minkee piece, about 1 1/3″ from the top.

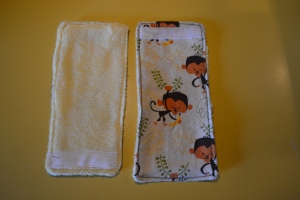
5. Take the  pieces  of fabric with the velcro and place them together like they are in the picture (It might seem like it’s wrong but it’s right, trust me!)

6. beginning  on  one of the sides  stitch the edges  leaving an opening to turn the tab right side out.  Using your knitting needle push the edges and corners out.  Topstitch the edges all the way around, being sure to close up the opening as you go.  Repeat steps 5 and 6 to make the second tab.

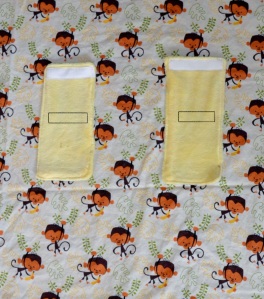
7. About 13″ from the  top of the main piece place the tabs and pin them in place.

Sew them on to the main piece, through both pieces of fabric ( This will prevent the  layers from separating when it is attached to the handle of the car seat) by sewing a rectangle shape in the center of the tabs.  I drew the rectangles on the picture to make the directions a little clearer.

That’s it!  If you need clarification on any of the directions just leave a comment and let me know.  Thanks for stopping by.

The End of Another School Year

This Wednesday marks the end of another school year for my oldest two girls.  It also  marks the beginning of a well deserved vacation for the lovely teachers who have spent the last 10 months teaching them.  I have a huge respect for teachers and when the  end of the school year rolls around I like to give a thank you gift to acknowledge all their hard work.

As the end June got closer and closer I  was still looking for gift ideas when my friend Small Town Girl  blogged about a gift she was making for her daughters teacher.  I thought it was a great idea and started looking around for an apron tutorial.  I found one here and got started.

Being a novice sewist this was a very straight forward and easy to follow tutorial that allowed me to make this:

and  this:

Aside from a few mistakes on my part I think they turned out quite well.  I love the colors and quite frankly I needed an excuse to buy this fabric that I had been  eyeing for a long time at the fabric store.

I  wanted to add  some thing to it  so that it  would be  more personal and the teachers would remember who had given it to them down the road.  I  decided  that I was going to try my hand at appliques.

I traced my Daughters hand onto a  piece of cardboard  from a cereal box. I then used that as a template  to cut a  piece of fabric, a piece of iron on interfacing and a piece of stitch witchery.  I ironed the  interfacing on and then placed the stitch witchery between the  hand print and the apron and ironed it on.  The final step was  doing a zig zag stitch around the outside of the hand print.  It looks pretty good.  The were a few rough patches around the tips of the fingers but overall I am pleased for my first attempt.

I just need to write her name and school year on it and it’s finished.  I am totally biased but I think the hand print is pretty adorable and adds  a personal touch to the gift.